The Ultimate Guide to Playing Hoodwink as Support in Dota 2 (Patch 7.36b)
Learn how to dominate as a position 4/5 Hoodwink support in Dota 2. This comprehensive 2500-word guide covers ability builds, itemization, laning strategies, and teamfight execution to climb MMR with the elusive squirrel hero.
Mastering Hoodwink Support: A Complete Dota 2 Guide
Introduction: Why Hoodwink as Support?
Hoodwink has evolved from a niche core pick into one of Dota 2’s most versatile and potent support heroes in recent patches. With a toolkit featuring crowd control, vision, burst damage, and escape mechanisms, she embodies the modern support paradigm that can create space, secure kills, and survive against aggressive lineups. In Patch 7.36b, Hoodwink’s flexibility with Innate abilities and Facets makes her particularly compelling for support players looking to impact games from the early stages through late-game teamfights.
This guide will transform your understanding of support Hoodwink, covering everything from lane mechanics to game-winning Acorn Shot angles. Whether you’re a seasoned support player or trying Hoodwink for the first time, you’ll find actionable strategies to immediately improve your gameplay.
Hoodwink’s Kit: Support-Specific Ability Analysis
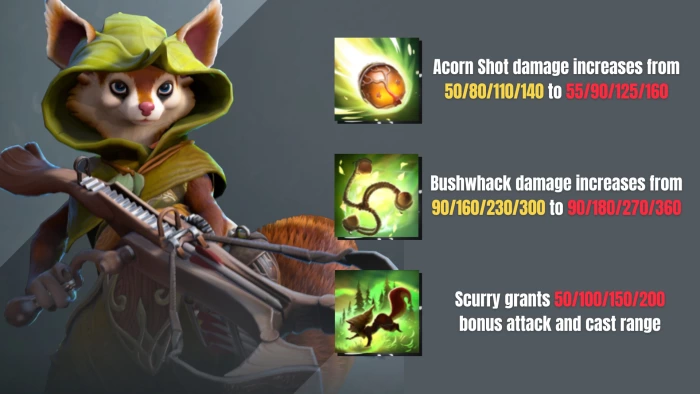
Acorn Shot (Q)
Primary Functions for Support:
-
Harassment Tool: At level 1, Acorn Shot deals 100 damage plus your right-click to enemies, and bounces to additional targets. This allows you to harass both the enemy carry and support simultaneously, creating lane dominance.
-
Wave Manipulation: Use to secure range creeps when needed or push lanes before rotating. The bounce mechanic helps clear waves quickly for a support.
-
Vision Utility: The acorn provides 350 radius flying vision where it lands for 2 seconds—perfect for checking high grounds, Roshan pits, or forest juke paths.
-
Scare Cannon: The threat of acorn bounce often zones enemies away from their creeps, creating last-hit difficulties for the enemy carry.
Support-Specific Tips:
-
Max this first in lanes where you can aggressively harass (vs melee carries)
-
Use the vision to scout without face-checking dangerous areas
-
Combine with Bushwhack for guaranteed bounce hits
Bushwhack (W)
Your Primary Disable:
-
Setup for Kills: 1.5/2/2.5/3 second stun is substantial at all stages. The trap activates after a 1.5-second delay, requiring setup or prediction.
-
Terrain Synergy: Always look for trees to extend the stun duration. A 3.75 second stun at level 4 is game-changing.
-
Wave Stall: Place Bushwhack on ranged creeps to stall pushes or protect towers.
-
Area Denial: The threat of Bushwhack can zone enemies from key areas during teamfights or objectives.
Advanced Techniques:
-
“Acorn into Bushwhack” combo: Acorn Shot on a hero near trees, then immediately Bushwhack the tree the acorn creates
-
Roshan pit control: Trap the entrance trees during Roshan attempts
-
High ground defense: Place traps on stairwells during sieges
Scurry (E)
Positioning & Survival:
-
Escape Mechanism: 40% evasion and phased movement through trees for 3.5 seconds is your survival tool. Use proactively when ganked or to reposition in fights.
-
Map Mobility: Move through forests at 40% bonus speed to rotate between lanes efficiently.
-
Positioning for Ult: Scurry lets you find the perfect Sharpshooter angle, then provides evasion while channeling.
-
Vision Advantage: The tree-walking aspect provides unexpected ward spots and vantage points.
Support Application:
-
Deep warding without detection risk
-
Body blocking escapes while phased
-
Dodging projectile stuns with timed activation
Sharpshooter (R)
Game-Changing Ultimate:
-
Pickoff Potential: 400-700 pure damage at level 1-3 can delete supports or heavily damage cores.
-
Teamfight Initiation: A well-placed Sharpshooter can force BKB or disable key targets before fights begin.
-
Vision Tool: Provides 1000 range true sight along the path—exceptional for detecting smoked enemies or invis heroes.
-
Channel Interruption: The ministun breaks channels like TP, Fiend’s Grip, or Black Hole.
Critical Support Considerations:
-
Use primarily for pickoffs in early-mid game
-
Transition to teamfight initiation/disruption later
-
Never hold for “perfect shot”—a forced BKB is valuable
-
Communicate with team about your channel timing
Innate Ability: Lucky Shot
Passive Disable:
-
15% chance on attacks to apply a 100% miss rate and 75% move slow for 3 seconds. This passive makes your right-click harass more threatening and provides unexpected survivability against physical carries.
Facet Choice: Forager’s Trail vs. Nimble Warden
Forager’s Trail (Support Preference):
-
Gain 5% movement speed per nearby tree (max 30%). This synergizes with Scurry for exceptional map mobility and positioning. The constant speed boost helps with rotations, warding, and teamfight repositioning.
Nimble Warden (Situational):
-
20% cooldown reduction on abilities when near 3+ trees. Better for spells-heavy gameplay but less reliable than consistent movement speed.
For support, Forager’s Trail is generally superior for the rotational power.
Talent Tree Analysis for Support
Level 10: +1.5s Scurry Duration vs +8% Spell Amplification
-
Scurry duration is typically better for survival and positioning
Level 15: +40 Acorn Shot Damage vs +25% Sharpshooter Damage
-
Acorn damage enhances your farming, push, and harassment
-
Sharpshooter damage only if you’re consistently landing full charges
Level 20: +25% Lucky Shot Chance vs +0.4s Bushwhack Stun
-
Lucky Shot chance provides more control and miss chance
-
Bushwhack duration if your team lacks lockdown
Level 25: Sharpshooter Pierces Spell Immunity vs 2 Acorn Shot Charges
-
Piercing BKB is game-winning against spell-immunity reliant cores
-
Double Acorn is situationally better for split push and control
Item Build: Support Hoodwink Essentials
Starting Items (Pos 4/5 Variations)
Position 5 (Hard Support):
-
Tango, Healing Salve
-
Enchanted Mango
-
Iron Branch x2
-
Sentry Ward
-
Observer Ward
-
Faerie Fire
Position 4 (Soft Support):
-
Tango, Healing Salve
-
Wind Lace
-
Iron Branch x2
-
Orb of Venom (aggressive lanes)
-
Observer Ward
Early Game Core (0-15 minutes)
Mana Boots (Arcane):
-
Solves Hoodwink’s mana issues
-
Can be disassembled later for other items
-
Enables spell spam in lane
Magic Wand:
-
Essential for survivability
-
Synergizes with Hoodwink’s tendency to be focused
Medallion of Courage/Solar Crest:
-
Amplifies physical damage from your carry
-
Provides armor for survivability
-
Mana regeneration component
Optional Early Items:
-
Urn of Shadows: If no natural carrier, provides sustain and kill threat
-
Spirit Vessel: Against healing lineups (Morphling, Alchemist, etc.)
-
Glimmer Cape: If facing magical burst
Mid Game Progression (15-30 minutes)
Aether Lens:
-
Increases all spell ranges by 225
-
Critical for safer Bushwhack placement and Sharpshooter positioning
-
Provides additional mana pool
Force Staff:
-
Save tool for allies
-
Repositioning for better angles
-
Escape mechanism when Scurry is on cooldown
Rod of Atos:
-
Sets up guaranteed Bushwhack traps
-
Provides stats Hoodwink lacks
-
Builds into Gleipnir later
Alternative Paths:
-
Eul’s Scepter: Self-purge, setup, mana regeneration
-
Pavise: Protection for allies against physical burst
-
Ghost Scepter: Versus heavy right-click lineups
Late Game & Luxury Items (30+ minutes)
Gleipnir:
-
Converts Rod of Atos
-
Provides AoE root that combos with Sharpshooter
-
Farming and wave clear capabilities
Octarine Core:
-
Reduces cooldowns significantly
-
Increases survivability with health
-
More Sharpshooter uptime
Aghanim’s Scepter:
-
Transforms Sharpshooter into a 3-charge ability with 20-second cooldown per charge
-
Less damage per shot but vastly more flexible
-
Excellent for high-tempo games
Situational Luxury:
-
Scythe of Vyse: Hard disable against elusive cores
-
Shiva’s Guard: AoE slow and armor versus physical teams
-
Ethereal Blade: Amplifies magic damage if paired with magical cores
Laning Stage: Dominating the Early Game
Position 4 Hoodwink (Offlane)
Strong Matchups: Melee carries (Spectre, Wraith King, Lifestealer), weak lane supports
Game Plan:
-
Level 1: Start with Acorn Shot to harass both enemies simultaneously. Focus on establishing lane equilibrium favorable to your offlaner.
-
Level 2: Add Bushwhack for kill threat. Coordinate with your offlaner to secure kills when enemies are out of position.
-
Pull Timings: Use Acorn Shot to harass when enemies approach for last hits. Stack and pull when lane pushes.
-
Rotation Windows: Once your offlaner is stable (usually level 3-5), rotate to mid for a gank with Sharpshooter at level 6.
Key Concepts:
-
Use trees for extended Bushwhack stuns
-
Harass the support to force them to use regen
-
Secure range creeps with Acorn when needed
-
Maintain vision of enemy jungle to track rotations
Position 5 Hoodwink (Safeline)
Strong Matchups: Weak offlane duos, melee offlaners
Game Plan:
-
Level 1: Bushwhack can be better for securing first blood if your carry has early damage. Otherwise, Acorn for harassment.
-
Trading Stance: Use Scurry to avoid damage while harassing. Your evasion makes you deceptively tanky.
-
Pull Control: Constantly single-pull and stack to maintain equilibrium near your tower.
-
Protection Duty: Keep Bushwhack available to save your carry from ganks.
Key Concepts:
-
Prioritize your carry’s farm over everything
-
Pull when lane pushes past river
-
Use Bushwhack defensively on creeps being attacked under tower
-
Communicate missing heroes aggressively
Mid Game Rotations and Map Control
Timing Windows
Level 6 Power Spike: Your first major timing. Look for a rotation to mid or the other side lane to secure a kill with Sharpshooter.
Arcane Boots Completion: Allows more frequent spell usage for farming and fighting.
Level 10 Talent: Enhanced Scurry duration significantly improves survivability and positioning.
Warding as Hoodwink
Unique Advantages:
-
Scurry allows deep warding without showing on map
-
Acorn Shot provides temporary vision for safer warding
-
Bushwhack can protect ward spots
Priority Ward Locations:
-
Enemy Jungle Entries: Track farming patterns
-
Roshan Pit: Critical from minute 10 onward
-
Triangle Areas: High-value farm zones
-
Shrine Spots: Control over outpost usage
Gank Execution
The Perfect Rotation:
-
Smoke with one or two allies
-
Use Scurry for optimal positioning
-
Lead with Bushwhack (if you can guarantee) or force staff
-
Follow up with Acorn Shot for damage and slow
-
Finish with Sharpshooter if needed
Target Priority:
-
Heroes without escape mechanisms
-
Cores showing in dangerous positions
-
Supports warding/dewarding
Teamfight Execution: Support Hoodwink’s Role
Pre-Fight Preparation
-
Vision Control: Ensure you have vision of key areas and deward enemy vision.
-
Positioning: Identify where you can channel Sharpshooter safely.
-
Cooldown Tracking: Note important enemy spells (BKB, saves, escapes).
Fight Phases
Initiation (if you have Aghanim’s):
-
Use charge of Sharpshooter to force BKB or damage key target
-
Follow up with Bushwhack on grouped enemies
-
Acorn Shot for AoE damage
Counter-Initiation:
-
Save Bushwhack for enemies who jump your backline
-
Use Force Staff to save allies
-
Channel Sharpshooter on diving enemies
Disruption:
-
Constant Acorn Shots for damage and Lucky Shot procs
-
Body block with Scurry evasion
-
Use items (Force, Glimmer, Solar) to protect allies
Target Priority in Teamfights
-
Channeling Heroes: Sharpshooter ministun cancels important channels
-
Backline Supports: Remove save capabilities
-
Cores without BKB: Maximum damage output
-
Elusive Heroes: Root with Gleipnir/Bushwhack
Late Game Strategy and Scaling
Objective Control
High Ground Siege:
-
Use Sharpshooter to poke defenders
-
Place Bushwhack traps on stairwells
-
Acorn Shot to clear waves safely
High Ground Defense:
-
Channel Sharpshooter on sieging cores
-
Bushwhack melee creeps to stall pushes
-
Use Scurry to avoid initiation
Roshan Control:
-
Ward aggressively around pit
-
Use Sharpshooter vision to check
-
Save Bushwhack for pit entrance
Vision Game
Smoke Detection:
-
Sharpshooter provides true sight along path
-
Use to check common smoke paths
-
Communicate immediately if you spot smoked enemies
Dewarding:
-
Your mobility helps find enemy wards
-
Use Acorn vision to check common spots
-
Carry sentries to deward during Scurry
Countering Hoodwink and Bad Matchups
Heroes Hoodwink Struggles Against
Gap-Closing Initiators:
-
Axe (Berserker’s Call through evasion)
-
Spirit Breaker (Charge of Darkness)
-
Clockwerk (Hookshot, Battery Assault)
Solutions:
-
Position farther back in fights
-
Early Force Staff
-
Save Bushwhack for when they jump you
Magic Burst:
-
Zeus (true sight, magic damage)
-
Skywrath Mage (silence, magic damage)
-
Lina (pure damage Laguna)
Solutions:
-
Glimmer Cape
-
Magic resistance items (Cloak, Raindrop early)
-
Positioning awareness
Vision Denial:
-
Slardar (Amplify Damage)
-
Bounty Hunter (Track)
-
Zeus (Thundergod’s Wrath)
Solutions:
-
Stay with team
-
Linken’s Sphere in late game
-
Counter-ward aggressively
Lane Counters
Strong Dispel Supports:
-
Abaddon (Aphotic Shield)
-
Oracle (Fortune’s End, False Promise)
-
Legion Commander (Press the Attack)
Playstyle Adjustment:
-
Focus on harassment over kill attempts
-
Coordinate disables with your lane partner
-
Rotate earlier to other lanes
Advanced Tips and Tricks
Combos and Interactions
-
Acorn-Bushwhack Combo: Acorn Shot creates a tree at the target location. Immediately Bushwhack that tree to trap enemies who think they’re safe.
-
Force-Bushwhack: Force Staff yourself or enemy into a tree, then Bushwhack.
-
Scurry-Sight Juke: Use Scurry to tree-walk, then TP. Enemies lose vision, making interrupts difficult.
-
Sharpshooter Vision: Use the true sight to scout Roshan without face-checking.
Minimizing Weaknesses
Mana Management:
-
Use Arcane Boots wisely
-
Clarities during downtime
-
Consider Kaya-based items later
Survivability:
-
Never be the frontline
-
Scurry proactively, not reactively
-
Itemize for stats (Rod of Atos, Octarine)
Communication Essentials
Sharpshooter Timing: “Channeling ult on [hero]”
Bushwhack Traps: “Trap set on stairs, care”
Scouting Information: “[Hero] farming their triangle”
Patch 7.36b Specific Considerations
Innate & Facet Synergies
Forager’s Trail Positioning: With max movement speed near trees, you can maintain optimal positioning constantly. Use this to stay at the edge of fights.
Lucky Shot Timing: The 15% miss chance is particularly strong against meta carries like Troll Warlord, Faceless Void, and Sven.
Meta Matchups
Against Universal Heroes: Hoodwink’s physical damage harassment is effective against low-armor universal heroes trending in the meta.
With Popular Cores:
-
Primal Beast: Combo Bushwhack with Trample damage
-
Kunkka: Set up for Torrent with Bushwhack
-
Pudge: Bushwhack into Meat Hook
Conclusion: Climbing MMR with Support Hoodwink
Hoodwink represents the evolution of support heroes in Dota 2—high impact, versatile, and skill-expressive. Her ability to control lanes, secure pickoffs, and contribute meaningfully to teamfights makes her a valuable addition to any support player’s repertoire.
Key Takeaways:
-
Maximize lane impact through intelligent Acorn Shot usage
-
Use Scurry proactively for positioning and survival
-
Communicate your Sharpshooter timings for maximum team coordination
-
Adapt your item build to each game’s specific requirements
-
Master the Acorn-Bushwhack combo for reliable disables
With practice, you’ll find Hoodwink can single-handedly swing games through well-placed Bushwhacks and game-winning Sharpshooters. Her skill ceiling is high, but the payoff in MMR and gameplay satisfaction is well worth the investment.
Remember: as a support Hoodwink, you’re not just a setup hero—you’re a playmaker, vision controller, and tempo setter. Embrace the versatility, and you’ll quickly become the backbone of your team’s success.