How to play Abaddon Hard Support
Why Abaddon as Hard Support?
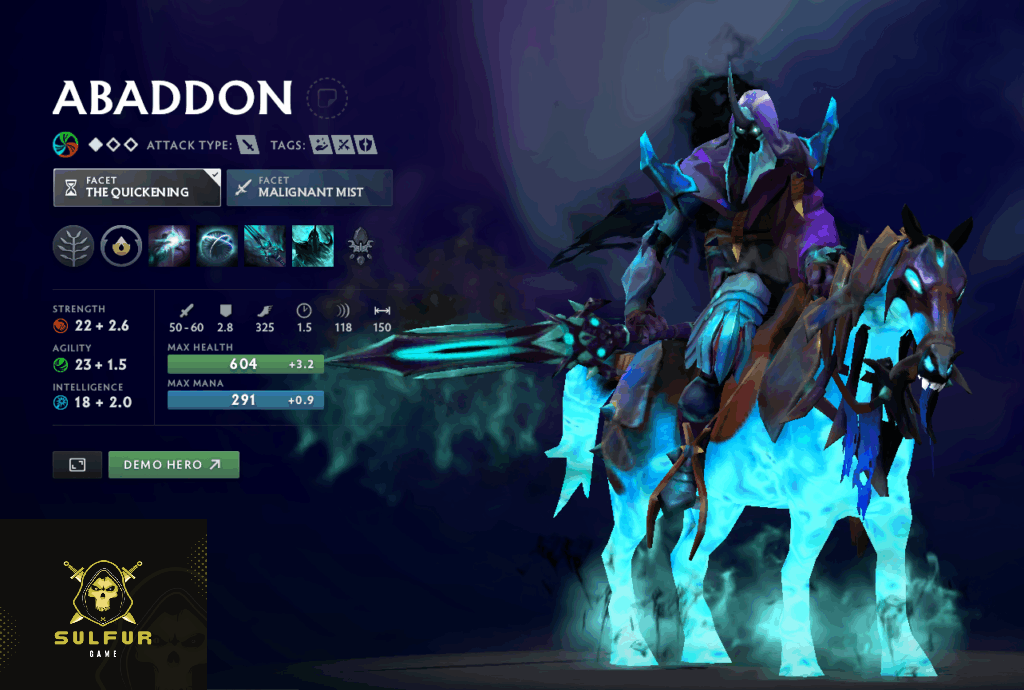
In the ever-evolving meta of Dota 2, few heroes offer the unique combination of durability, utility, and game-changing saves that Abaddon provides. Traditionally seen as an offlane or carry hero, Abaddon has emerged as a formidable hard support pick in professional and high-level pub games. His ability to sustain allies, dispel critical debuffs, and create space makes him an exceptional position 5 hero who can single-handedly swing team fights.
This comprehensive 3000-word guide will walk you through everything you need to dominate as Abaddon hard support—from skill builds and itemization to laning strategies and late-game impact. Whether you’re a support main looking to expand your hero pool or an Abaddon enthusiast wanting to try a new role, this guide has you covered.
Why Abaddon Works as Hard Support
Abaddon’s kit contains several attributes that make him an excellent hard support:
-
Low Resource Dependence: Unlike many supports, Abaddon doesn’t rely heavily on items to be effective. His spells are impactful even with minimal farm.
-
Exceptional Sustainability: With Aphotic Shield and Mist Coil, Abaddon can keep his core heroes in lane longer, effectively increasing your team’s total net worth.
-
Built-in Survival Mechanism: Borrowed Time makes him incredibly difficult to kill, allowing for aggressive warding and deep positioning that would be suicidal for other supports.
-
Dispel Utility: Aphotic Shield provides a basic dispel, countering numerous disables and slows in the game—a rare and valuable ability on a support.
-
Flexible Itemization: Abaddon can build almost any support item effectively, allowing you to adapt to each game’s needs.
Skill Build and Talent Choices
Standard Hard Support Skill Build
Level 1: Aphotic Shield – This is almost always your starting skill. The damage, dispel, and protection are invaluable for level 1 skirmishes and saving allies.
Level 2: Mist Coil – Provides healing or nuke damage. Perfect for securing ranged creeps or saving an ally from a last tick of damage.
Level 3: Aphotic Shield – The value point in Curse of Avernus isn’t worth it this early. Maximize your shield effectiveness.
Level 4: Mist Coil
Level 5: Aphotic Shield
Level 6: Borrowed Time – Your ultimate is a game-changer, but don’t be afraid to skip it at 6 if the enemy has no burst damage and you need more points in your basic spells.
Level 7: Aphotic Shield (Maxed)
Level 8-10: Mist Coil (Maxed)
Level 11-14: Curse of Avernus
Level 15-18: Stats/Borrowed Time (if skipped earlier)
Level 19-25: Talents and remaining skills
Situational Variations
Against heavy harass lanes: Consider an extra early point in Mist Coil for additional sustain.
When facing illusion heroes: Earlier points in Curse of Avernus can help clear illusions faster.
Against burst lineups: Take Borrowed Time at level 6 without exception.
Talent Tree Choices
Level 10: +90 Gold/Min vs +8 Strength
-
The gold talent is almost always better for a hard support. The consistent income helps you secure crucial items.
Level 15: +350 Aphotic Shield Health vs +80 Mist Coil Heal/Damage
-
The Aphotic Shield talent is generally superior as it increases both the protection and burst damage. Take Mist Coil talent if your team desperately needs more healing.
Level 20: +40 Movement Speed vs +200 Mist Coil Cast Range
-
Movement speed is typically more valuable for positioning and escaping. The cast range can be situationally useful against long-range heroes.
Level 25: +1.5s Curse of Avernus Slow Duration vs +425 Aphotic Shield Absorption
-
The Aphotic Shield talent turns your shield into a mini-Hood of Defiance. This is almost always the better choice for a support Abaddon.
Item Build Guide
Starting Items (625 Gold)
-
Tango
-
Healing Salve
-
Enchanted Mango
-
Clarity
-
Iron Branch x2
-
Observe Ward (your most important starting item as pos 5)
Alternative start if expecting heavy harassment:
-
Extra set of tangoes
-
Ring of Protection (builds into Basilius)
Early Game (0-10 minutes)
Core Items:
-
Magic Stick/Wand: Essential against spell-spamming opponents.
-
Boots of Speed: Mobility is key for positioning your spells.
-
Soul Ring: Solves all your mana problems and synergizes with Borrowed Time. This is your first major item in most games.
-
Wind Lace: Cheap movement speed that can later build into Tranquils or Drums.
Situational Early Items:
-
Ring of Basilius: If your carry benefits from the mana regen and armor.
-
Urn of Shadows: When your team needs additional healing and has kill potential.
-
Medallion of Courage: Against physical damage lineups or to enable Roshan attempts.
Mid Game (10-25 minutes)
Boots Upgrade:
-
Tranquil Boots: The standard choice. Provides sustain, armor, and excellent movement speed.
-
Arcane Boots: If your team is mana-hungry and no one else is building them.
-
Phase Boots: Rare, but consider against heavy physical damage when you need to be in the middle of fights.
Core Extension Items:
-
Aether Lens: Increases cast range on all your spells. Particularly valuable for safely applying Aphotic Shield and Mist Coil.
-
Glimmer Cape: Another save item that stacks with your kit. Can be used during Borrowed Time.
-
Force Staff: Versatile tool for saving allies, positioning, or escaping.
Situational Mid Game Items:
-
Spirit Vessel: Against high-healing or high-HP heroes (Morphling, Alchemist, etc.)
-
Solar Crest: Upgrade from Medallion. Excellent for taking objectives.
-
Vladmir’s Offering: If no one else is building it and your team benefits significantly.
Late Game (25+ minutes)
Utility Items:
-
Guardian Greaves: The ultimate support item if you can afford it. Provides dispel, heal, and mana.
-
Lotus Orb: Against single-target disables and debuffs. The dispel stacks with your Aphotic Shield.
-
Aeon Disk: When the enemy has too much burst to trigger Borrowed Time naturally.
-
Scythe of Vyse: If your team lacks disable and you have the farm.
Aghanim’s Shard and Scepter:
-
Shard (1400g): Allows Mist Coil to cast on spell-immune allies. Highly recommended purchase in most games around the 20-minute mark.
-
Scepter (4200g): Borrowed Time applies to all nearby allies. Situational but game-winning against global or AoE damage lineups (Zeus, Spectre, etc.)
Laning Stage Strategy (0-10 Minutes)
Pre-game Preparation
-
Block pull camp: Immediately block the enemy small camp with your observer ward.
-
Secure bounty runes: With your tankiness, you should contest at least one bounty rune.
-
Communication: Tell your carry your plan—whether you’ll be pulling, trading, or stacking.
In-lane Responsibilities
Primary Goal: Keep your carry alive and farming. This is more important than harassing the enemy.
Trading Stance:
-
Use Aphotic Shield proactively when trading hits
-
Position aggressively with your shield active to absorb harassment
-
Use Mist Coil to secure range creeps when your carry can’t
-
Save Mist Coil for healing your carry unless you can secure a kill
Pulling and Stacking:
-
Pull when the lane pushes too far forward
-
Stack camps at :53 for your carry to farm later
-
Don’t over-pull and leave your carry vulnerable to dives
Dewarding:
-
Always carry a sentry to deward the enemy observer
-
Place observer wards that give your carry vision of gank routes
Matchup Specific Advice
Against Dual Ranged: Use shield to absorb harassment and focus on pulling to control equilibrium.
Against Kill Lanes: Stay close to your carry, save shield for disables, and keep salves ready.
With a Melee Carry: Focus on keeping them healthy enough to last hit under harassment.
Mid Game Playstyle (10-25 Minutes)
Objective Focus
-
Protect your cores: Follow your most vulnerable core (usually your mid or carry) and keep them alive during fights and farming patterns.
-
Vision control: Use Borrowed Time to ward aggressively in enemy territory. Place deep wards around the next objective (enemy safelane tower, Roshan pit, etc.)
-
Smoke ganks: Participate in smoke ganks with your team. Your dispel can enable engagements by removing dust or track.
-
Save TP: Always have a TP scroll ready to counter-gank. A well-timed TP + Aphotic Shield can turn a gank around completely.
Teamfight Execution
Positioning: Stand slightly behind your cores but close enough to shield them. You want to be the second target, not the first.
Spell Priority:
-
Aphotic Shield on the ally being focused or disabled
-
Mist Coil to save low-HP allies or finish fleeing enemies
-
Borrowed Time reactively or proactively depending on the situation
-
Curse of Avernus attacks on priority targets if safe
Ultimate Usage:
-
Reactive: Let the enemy commit spells on you before activating
-
Proactive: Activate before big burst damage (Sniper ult, Laguna Blade, etc.)
-
Dispel: Remember Borrowed Time applies a strong dispel when activated
Late Game Impact (25+ Minutes)
High Ground Siege
When attacking:
-
Use shield on frontliners taking tower damage
-
Save Mist Coil for healing after engagements
-
Use Borrowed Time to tank tower hits and create space
When defending:
-
Shield allies being initiated on
-
Save Mist Coil for allies under Phoenix/Ignite/other DoT effects
-
Use Borrowed Time to bait enemy spells
Roshan Control
-
Shield allies tanking Roshan
-
Use Curse of Avernus to increase team attack speed
-
Save Borrowed Time to survive if the enemy contests
Buyback Management
As a hard support, your buyback is less critical than your cores’. However, if you have important items (Aghanim’s Scepter, Lotus Orb), consider saving for buyback in crucial late-game scenarios.
Advanced Techniques and Tips
Aphotic Shield Mastery
-
Double Dispelling: Cast Aphotic Shield, let it absorb damage, then manually destroy it with your “Stop” command to apply the dispel immediately.
-
Wave Clear: Use Aphotic Shield on ranged creeps to push waves safely from distance.
-
Scouting: Shield a creep and send it into dangerous areas to gain vision.
Borrowed Time Interactions
-
Self-Denial: You can deny yourself with Mist Coil even during Borrowed Time.
-
Item Usage: You can use items during Borrowed Time. Glimmer Cape, Force Staff, and Lotus Orb are particularly effective.
-
Toggle Abilities: Borrowed Time can be toggled on and off. Use this to save it for when you really need it.
Curse of Avernus Utility
-
Roshan Speed: Your passive significantly increases Roshan kill speed.
-
Tower Pushing: Apply Curse of Avernus to creeps hitting towers.
-
Slow Stacking: The slow stacks with other sources, providing significant chase potential.
Countering Abaddon
Heroes That Counter Abaddon
-
Ancient Apparition: Ice Blast prevents all healing, making Mist Coil useless and bypassing Borrowed Time.
-
Necrophos: Heartstopper Aura and Reaper’s Scythe work through Borrowed Time.
-
Spirit Vessel: Reduces healing and does percentage-based damage.
-
Axe: Culling Blade goes through Borrowed Time.
-
Shadow Demon: Demonic Purge slows through Borrowed Time and applies a strong dispel.
Item Counters
-
Spirit Vessel: As mentioned, crucial against Abaddon.
-
Skull Basher/Abyssal Blade: Can lock Abaddon down through Borrowed Time.
-
Heaven’s Halberd: Disarms Abaddon, making him useless during his ultimate.
-
Orchid Malevolence/Silencer: Prevents spell casting, though Borrowed Time will still activate automatically if health drops low.
Common Mistakes to Avoid
-
Using Aphotic Shield Too Early: Wait for debuffs to be applied before shielding.
-
Overusing Mist Coil for Harass: Your mana is better spent on shields and saving allies.
-
Activating Borrowed Time Prematurely: Let the enemy commit spells first.
-
Poor Positioning: Even though you’re tanky, you shouldn’t frontline as a support.
-
Ignoring Curse of Avernus: The slow and attack speed are valuable even with minimal points.
Professional Gameplay Examples
Study how professional players use Abaddon support:
-
Team Secret.YapzOr: Known for aggressive warding and perfect shield usage.
-
Evil Geniuses.Fly: Masters the sacrificial playstyle, dying to save cores.
-
**PSG.LGD.y`: Consistently finds game-saving coils and shields in teamfights.
Key takeaways: Notice their positioning, spell timing, and item choices based on game state.
Conclusion
Abaddon hard support is a versatile and impactful pick that excels in enabling fragile cores and countering disable-heavy lineups. His low economic requirements and high teamfight contribution make him an excellent choice in both pub and competitive games. Mastering Abaddon requires understanding dispel timing, ultimate management, and selfless play—but the reward is a hero that can single-handedly determine the outcome of teamfights and games.
Remember that as a hard support, your primary job is to enable your team. With Abaddon’s unique kit, you have all the tools to protect, sustain, and save your allies while being an annoying, unkillable presence on the battlefield.
FAQ: Abaddon Hard Support
Q: Is Abaddon really viable as a hard support?
A: Absolutely. While unconventional, Abaddon’s dispel, heal, and survivability make him an excellent position 5. He’s been picked in this role in professional tournaments with success.
Q: Should I max Aphotic Shield or Mist Coil first?
A: Aphotic Shield should almost always be maxed first. The lower cooldown, higher damage absorption, and consistent dispel are more valuable than the extra healing/damage from Mist Coil.
Q: When should I get Aghanim’s Scepter on support Abaddon?
A: Aghs is situational but extremely powerful against global damage (Zeus, Spectre), AoE magic damage (Leshrac, Timbersaw), or when your team is grouping as five. It’s a luxury item, so only build it when you’re having a good game or it directly counters the enemy draft.
Q: How do I deal with Ancient Apparition as Abaddon?
A: Against AA, your Mist Coil becomes much less useful for healing. Focus on using Aphotic Shield for dispels and damage absorption. Consider building items like Force Staff or Glimmer Cape to save allies without relying on healing.
Q: Should I use Borrowed Time proactively or reactively?
A: Generally, use it reactively to bait out enemy spells. However, there are situations for proactive use: when you know big burst is coming (Sniper Assassinate, Lion Finger), or when you need the strong dispel to remove a debilitating effect (Orchid, Silence).
Q: What’s the most important skill to master on Abaddon?
A: Aphotic Shield timing. Knowing when to apply it to dispel key debuffs (Silence, Slow, Stun) is what separates good Abaddon players from great ones.
Q: Can I roam as Abaddon support?
A: Yes, but carefully. Your ganking potential is limited without setup from allies. Successful roaming requires coordination with your midlaner or offlaner to secure kills with your slow and shield damage.
Q: Which neutral items are best on support Abaddon?
A: Tier 1: Trusty Shovel, Ocean Heart. Tier 2: Philosopher’s Stone, Grove Bow. Tier 3: Ceremonial Robe, Paladin Sword. Tier 4: Spell Prism, Timeless Relic. Tier 5: Force Boots, Seer Stone.
Q: How should I use Curse of Avernus as a support?
A: Use it to apply slow during chases, increase attack speed during Roshan or tower pushes, and to help clear illusions or summons. Even one point is valuable for the utility.
Q: What’s the biggest mistake Abaddon support players make?
A: Playing too aggressively because of Borrowed Time. Remember you’re still a support—your job is to save allies, not initiate fights. Position yourself to shield and coil your cores, not to right-click enemy heroes.